The app and website was publicly released on 2 Apr 2024
Update Jan 2025
The content continues to undergo review by all our cadres.
The content remains subject to the following provisos: - The content will be subject to continuous update and review - Old content (from previous CGOs) will be converted into the new format, using the new tools and layouts - Content may be moved around - The layout will change and reflect the needs of the user - Content will be created - Content may be deleted/retired
CGO development will continue.
Saf [Updated 21 Jan 2025]
Intraosseous (IO) Access
!Warning
Objectives
To guide military medical personnel in gaining intraosseous (IO) access to the circulatory system.
Scope
This guideline describes the procedure to gain IO access to the circulatory system. It is intended to support military clinicians in all situations where IO access may be required from forward pre-hospital emergency care setting through to deployed hospital care.
This guideline explains how to conduct IO access using the two IO access products used by the Defence Medical Services:
EZ-IO - the Arrow™ EZ-IO™ System
FAST IO - the FAST1™ IO System for use at sternal IO sites only.
Audience
This guideline is intended for use by military personnel who have already received training in the performance of IO access as part of their job role, including registered healthcare professionals and military medical personnel who are not professionally registered but have been appropriately trained in the use of IO devices.
Background
IO access is a widely used technique in emergency situations where access to a patient’s circulatory system is required but intravenous (IV) access is difficult or cannot be achieved quickly enough. IO access is recommended in these situations by both the UK Resuscitation Council and European Resuscitation Council. IO access has a low complication rate (<0.1%) when used in prehospital patients.
Indications
Failure to gain IV access in a patient (adult or paediatric) requiring emergency treatment.
Examples of these types of patients include:
cardiac arrest (medical or traumatic)
shocked patients (e.g. haemorrhage or sepsis)
severe trauma
seizures
hypothermia
severe burns
Preparation
Patient preparation
Ensure the patient is appropriately positioned: e.g. supine on a stretcher or semi-reclining
Ensure the area you wish to site the IO device in is exposed, and clean.
Insertion of an IO device and infusion through it will be painful in awake patients. If possible, give fast-acting oral, IM or IN analgesia prior to IO insertion.
Insertion site selection
In adults:
the proximal humerus is the preferred site for IO access due to proximity to the central venous circulation.
the proximal tibia can also be used but should be avoided if there is a suspicion of pelvic/intra-abdominal bleeding or vessel disruption.
the sternum can also be used (FAST™ only).
In children, refer to ‘Paediatric Considerations’ section below.
Do not attempt to insert an IO device if there is:
suspected or confirmed fracture at the insertion site
fracture suspected proximal to the insertion site
a tourniquet in place proximal to the insertion site
evidence of infection overlying the insertion site
Do not re-use sites of previous successful IO insertion within 48 hours of removing the previous device.
Landmark Identification
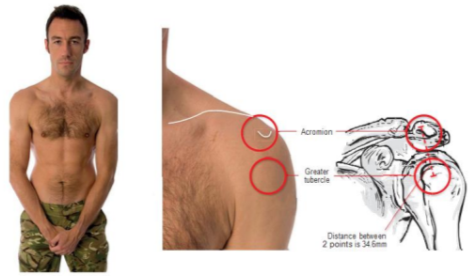
Proximal humerus:
Adduct and internally rotate the arm
Place the palm of your hand over the humeral head anteriorly (it should feel like a ball and this is the general area where the IO needle will be inserted)
Use your thumbs to palpate the humeral head and then move distally down the humerus: you will feel the ‘ball’ (humeral head) fall away from your thumbs as you move over the surgical neck of the humerus (where the bone shaft of the humerus meets the ball-like humeral head).
The insertion point is 1-2cm proximal to the surgical neck, which should correspond to the most prominent aspect of the greater tubercle.
Typically use the yellow needle for adult patients at this site.
Figure 1: Proximal Humerus Landmarks in Adults
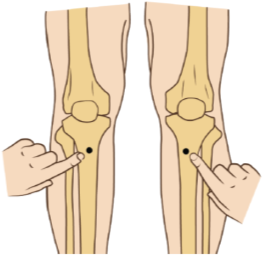
Proximal tibia:
Extend the leg
Find the tibial tuberosity
Insertion site is the wide flat surface of bone approx.. 2cm medial to the tibial tuberosity
Typically use the blue needle for adult patients at this site.
Figure2: Proximal Tibia IO Insertion Site
Equipment preparation
Two IO access systems are used by the DMS:
EZ-IO - the Teleflex® Arrow™ EZ-IO™ System
FAST IO - the Teleflex®FAST1™ IO System for use at sternal IO sites only.
Both systems have different components.
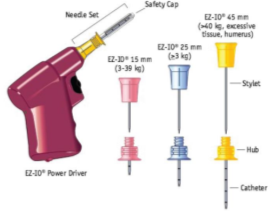
The EZ-IO™ Systemcomprises:
1x EZ-IO™ Power Driver. Check indicator light shows green by testing prior to use.
3x IO needles comprising: stylet-catheter assembly, with safety cap in sterile packaging in 3 sizes:
Yellow: 45mm needle length, usually for adult use
Blue: 25mm needle length, for adult or paediatric use
Pink: 15mm needle length, for paediatric use - not normally carried in DMS modules
1x EZ-Connect™ extension set: this must be primed with 0.9% saline or local anaesthetic (e.g. 2% lidocaine) depending on operator experience.
1x EZ-Stabiliser™ Dressing
1x Sharps disposal block
Figure3: EZ-IO™ Power Driver & Needle Sets
Needle-set selection
The EZ-IO™ needle-sets can but used on adults and children. The shortest, pink needle (15mm) is not normally available in the deployed setting.
The choice of needle will depend on the site chosen and patient body shape/weight. In general, for adult patients:
yellow needle-set = proximal humerus
blue needle-set = proximal tibia
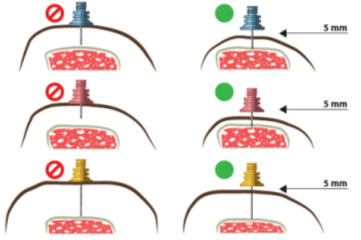
All needle-sets are marked with concentric black bands every 5mm. Then the needle tip is in contact with bone, the 5mm mark closest to the needle hub must be visible above the skin. This ensures the needle will be long enough to penetrate the bone cortex when the operator activates the driver, and ensures the tip will be in medullary bone.
If no concentric black band is visible when the needle tip is in contact with the bone, stop the procedure and exchange for a longer needle.
Figure4: Incorrect (L) vs Correct (R) Needle Length with 5mm marker band visible above the skin when needle-tip is in contact with bone.
The FAST1™ IO System is designed for sternal IO access only and comprises:
FAST IO insertion device with needle cover
1x Target patch
1x Protective dome dressing
1x red sharps plug
Figure 5: FAST1™ IO System components (source: www.teleflex.com)
Additional equipment
If available, you should supplement your IO equipment with:
Cleaning swabs/wipes
3-way tap (to connect to the extension tube from the device)
50ml syringe (to connect to the 3-way tap) to help rapidly administer larger fluid/medication volumes
Sharps bin
Clinical waste bag
You should also prepare:
Any medications you intend to deliver through the IO device
A flush syringe to follow any medications you administer (10ml of 0.9% sodium chloride)
Procedure
EZ-IO™ System
Conduct actions listed in ‘Equipment Preparation’ above including priming the extension set.
Select and identify site as outlined in ‘Landmark Identification’ above: consider injury pattern, team positions, patient age and weight.
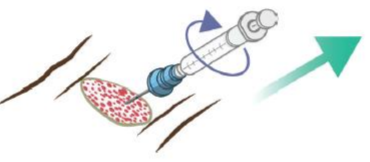
Proximal humerus: aim needle-set at a 45-degree angle as if aiming for opposite hip.
Proximal tibia/distal tibia/distal femur: aim needle-set at 90-degree angle to the bone.
Clean the insertion site, then while allowing to dry load the needle-set onto driver; maintain aseptic technique and do not touch metal parts.
Push needle tip through skin until needle tip rests on bone. Confirm at least one black line is visible above the skin prior to drilling.
Squeeze trigger and apply gentle, steady pressure, keeping angle consistent. Immediately release trigger when you feel a ‘give’ or loss of resistance.
Unscrew introducer needle and dispose of safely in sharps bin/sharps block.
Apply stabiliser dressing.
Connect primed extension set (with 3-way tap if available) to the needle hub (screw-fit).
Ensure the white clip on the extension set is open.
Attempt to aspirate a small amount of bone marrow to confirm placement. Bone marrow may not always be aspirated.
Flush rapidly with 5-10ml 0.9% saline. Be aware that flushing the correctly sited IO device is likely to cause significant discomfort to the conscious patient.
Once flushed, drugs and fluids can be administered via the 3-way tap or by directly connecting to the bung on the end of the extension set – do not connect syringes directly to the IO needle hub as this risks dislodging the device.
Immobilise or secure the limb used for IO access to prevent displacement.
FAST IO System
Conduct actions listed in ‘Equipment Preparation’.
Identify the sternal notch and manubrium: the manubrium is the site for insertion.
Clean the area and while allowing to dry remove protector dome and tab 1 from the adhesive side of the target patch.
Keeping the concave part of the target patch in-line with the sternal notch, place target patch on chest. The hole on the target patch should overly the manubrium. Peel off tab 2 and ensure the target patch is stuck down to the chest securely.
Place the needles of the FAST IO device into the target zone of the target patch, ensuring needles are at 90-degrees to the patient’s chest. Using a two-handed grip, press down on the device with firm and increasing pressure until the device releases.
Remove the device and put the needles into the red sharps plug: the device is now safe and is not reusable. Dispose of in sharps bin.
Remove the blue cap from the end of the connector tubing on the target patch and connect to the IO tube. Remove the white cap from the base of the connector tubing on the target patch and attempt to aspirate a small amount of bone marrow to confirm placement.
Flush rapidly with 5-10ml 0.9% saline then connect to a giving set or 3-way tap if using. Do not leave the end of the connector tubing uncovered.
Secure the protector dome over the target patch.
It may not always be possible to aspirate bone marrow following device insertion, but failure to aspirate may be a warning sign that the device is not sited correctly. Proceed with caution and check carefully for fluid extravasation when flushing.
In both devices, an initial flush with local anaesthetic may be used by experienced operators; this is unlikely to reduce the pain associated with the flush itself but may make subsequent infusion less uncomfortable. The recommended dose is 40mg lidocaine (4ml of 1% concentration or 2ml of 2% concentration).
Post-Procedure Care
Infusions by IO need pressure to achieve sufficient flow rates. This can be achieved by a pressure bag, gentle manual pressure on the infusion bag, or by using a syringe and 3-way tap system (see ‘infusions of blood or crystalloid via IO access systems’ below).
In conscious patients, ensure pain due to IO infusion is treated adequately.
Aim to convert IO access to peripheral IV access as soon as possible if resources allow.
During infusion/drug administration, observe for signs of local swelling that may indicate device displacement, and remove/stop if this occurs. Complications are rare but may can include:
local swelling/oedema: e.g. if ‘though and through’ needle penetration has occurred (more likely in children) or the IO needle becomes displaced from the medullary bone.
osteomyelitis, osteonecrosis, compartment syndrome (rare, occurring <0.1% of cases in one study of 5387 patients)
EZ-IO™ needles can remain in-situ for up to 48hrs but should be removed as soon as more secure peripheral or central IV access has been achieved.
The FAST sternal IO should be removed as soon as soon as more secure peripheral or central IV access has been achieved.
The site of IO access must be noted in clinical documentation and clearly communicated to subsequent treatment teams.
Paediatric Considerations
Peripheral IV access can be particularly challenging in unwell paediatric patients. IO access is a recommended technique for paediatric patients of all ages requiring emergency medications where IV access has not been achieved quickly or is not possible.
The FAST IO device is only recommended for use in children aged >12 years. The EZ-IO device may be used in children of any age but there are some differences regarding IO site selection, landmark identification and needle-set selection.
Insertion site selection in children
In children more insertion sites can be used:
the proximal tibia is most commonly used (easily identifiable, away from airway/chest in resuscitation)
distal tibia
distal femur
proximal humerus: may be harder to identify in children. Use if pelvic/lower limb trauma prevents use of other sites.
Landmark identification in children
Proximal humerus - as for adults.
Proximal tibia:
Newborns, infants and small children: 1cm below and 1cm medial to the tibial tuberosity on the anteromedial surface of the tibia. Very young children may not have yet developed a palpable tibial tuberosity: in such cases the insertion point is 2-3cm distal to and 1cm medial to the lower end of the patella.
Older children and adolescents: 2-3cm below and medial to the tibial tuberosity on the anteromedial surface of the tibia.
Distal tibia (children <16yrs only)
Newborns, infants, small children: 1-2cm proximal to the most prominent aspect of the medial malleolus
Older children: 3cm proximal to the most prominent part of the medial malleolus.
Distal femur (children <6yrs only)
The general area is the centre-medial aspect of the distal femur (avoid the patellar tendon in the midline).
Hold the leg straight, knee immobilised.
Site should be 1-2cm above the patella and 1-2cm medial from the midline.
Needle-set selection in children
All EZ-IO needle-sets can be used on children. Needle-set selection using the concentric black bands is the same for children and adults.
blue EZ-IO™ needle-set = all sites depending on age/weight.
The pink EZ-IO™ needle-set is particularly intended for newborns or infants. This needle is not carried within any DMS modules and is therefore unlikely to be available on deployed operations. The manufacturer's advice is that the blue needle can be safely used on any patient >3kg.
Selection of needle by colour based on age and site is only a guide: if no concentric black band is visible when the needle tip is in contact with the bone, stop the procedure and exchange for a longer needle.
The FAST1™ IO system is only recommended for use on children aged >12yrs.
IO flush with local anaesthetic may also be used in children to reduce pain related to IO infusion; the dose is 0.5mg/kg lidocaine to a maximum of 40mg.
Prolonged Casualty Care
IO needles should be removed as soon as more secure IV access can be achieved. It is advisable to immobilise/secure limbs used for IO access to reduce the risk of needle displacement during casualty movement etc and for conscious patients this immobilisation should not be continued longer than necessary: it will be uncomfortable and will make onward movement/self care etc more difficult.
Peripheral IV access in shocked patients should become easier as treatment progresses.
Although the manufacturer recommends EZ-IO™ removal within 48 hours of insertion, in the prolonged casualty care setting it would be acceptable to continue to use the IO needle if this was the only point of circulatory access available for a patient who required time-critical medications. In this situation, the likely harm from not giving further treatments would probably be greater than the risks of complications from the IO needle remaining in situ for longer than 48 hours.
Background Information
IO access is now widely available, and the use of this technique has increased, particularly in the prehospital setting.
IO needles are usually placed in the proximal or distal ends of long bones (eg humerus). The IO needle is inserted through skin, periosteum, bone cortex and into the medullary cavity. This provides access to a non-collapsible venous plexus which drains into the central circulation. Medications and fluids administered by an IO needle will therefore pass from the medullary cavity to the central circulation.
Military medical staff may need to deliver IO access in several patient groups (adult or paediatric). These patients will require time-critical treatments but have a high chance of having difficult IV access. Examples would be:
Patients in cardiac arrest (medical or traumatic)
Patients who are shocked (e.g. due to haemorrhage or sepsis)
Patients with severe trauma (e.g. amputation/limb contamination may preclude IV access)
Patients with seizures where seizure activity makes IV access difficult
Patients with hypothermia
Patients with severe burns
The above list is not exhaustive. Generally, if patients have a requirement for time-critical treatment (e.g. emergency drugs in cardiac arrest, shock, sepsis, seizures) and IV access has not been achieved quickly, further delays trying to gain IV access are likely to cause more harm than gaining IO access.
All commonly used IV drugs can be given via the IO route.
Device Removal
EZ-IO™ needles can be easily removed by pulling them straight out with gentle and sustained pressure. If available, a 5ml or 10ml leur-lock syringe can be attached to the needle hub to aid removal. If needed the needle can be rotated gently clockwise whilst pulling. Do not rock or bend the needle whilst removing.
Infusions of fluid via IO
Flow rates under gravity alone when using IO access systems can be low. This may create problems where patients require rapid infusion (e.g. blood/blood products to treat haemorrhagic shock).
In these situations, more rapid infusion can be achieved using a 3-way tap connected to the IO needle extension set, with a 50ml syringe and the fluid to be infused connected to the remaining two ports of the 3-way tap. Clinicians should be aware that this requires the full attention of one team member, and significant hand strength. It is also extremely painful in awake patients.
FAST IO devices will usually allow some infusion under gravity, although this may be slow. However,, EZ-IO devices will often not allow any infusion at all under gravity alone - infusion via a syringe will be required to give any volume of fluids.
Procedure for rapid infusion via IO using 3-way tap and 50ml syringe:
Connect the 3-way tap to the primed IO extension tubing.
Prime the giving-set connected to the infusion fluid then close the stopper on the giving set.
Connect the giving set to the 3-way tap.
Turn the 3-way tap ‘off’ to the patient but open to the syringe and infusion fluid.
Aspirate infusion fluid into the syringe
Turn the 3-way tap ‘off’ to the infusion fluid but ‘open’ to the patient and syringe.
Push fluid from the syringe into the patient.
Monitor and record volume infused.
If using a fluid warmer, connect the 3-way tap/syringe assembly after the fluid warmer system so that warmed fluid is ‘pulled’ into the 50ml syringe through the warming system. ‘Pushing’ fluid or medications through the warming system using the syringe can damage the warmer.
J. Soar, B.W. Böttiger, P. Carli, et al. European resuscitation council guidelines (2021): adult advanced life support. Resuscitation, 161 (2021), pp. 115-151, 10.1016/j.resuscitation.2021.02.010
Louise Breum Petersen, Søren Bie Bogh, Peter Martin Hansen, Louise Milling, Jens Stubager Knudsen, Helena Pedersen, Erika F. Christensen, Ulla Væggemose, Fredrik Folke, Signe Amalie Wolthers, Helle Collatz Christensen, Anne Craveiro Brøchner, Søren Mikkelsen, An assessment of long-term complications following prehospital intraosseous access: A nationwide study. Resuscitation, Volume 206, 2025, 110454, ISSN 0300-9572, https://doi.org/10.1016/j.resuscitation.2024.110454